
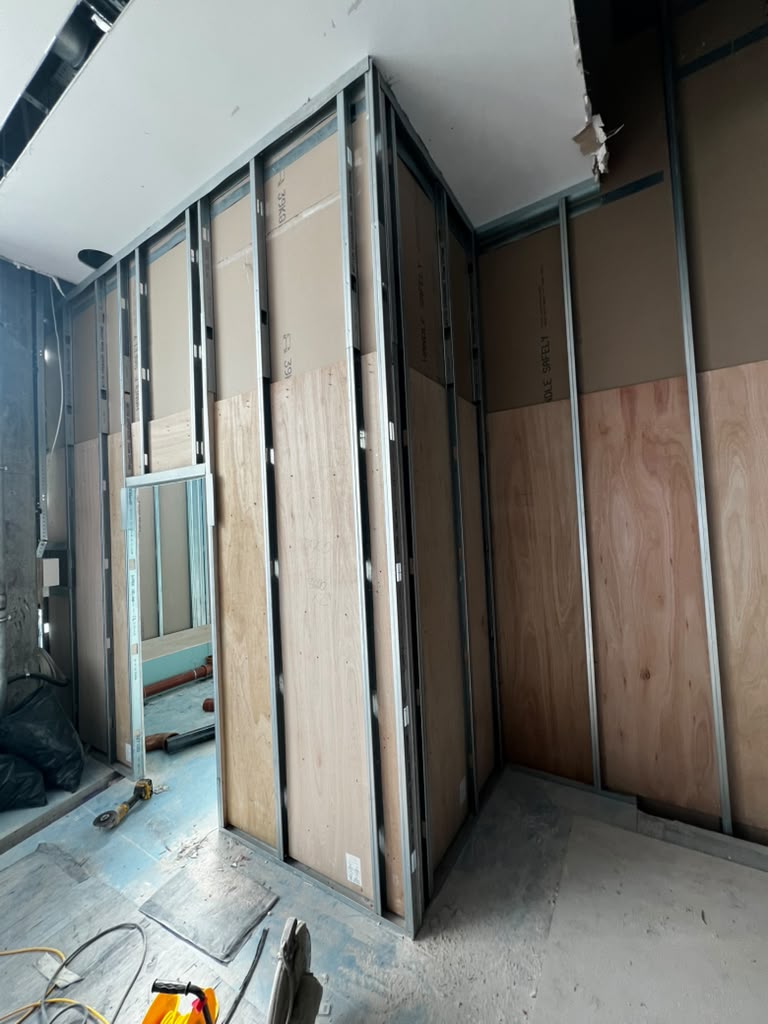
Pattressing is the solid backing fixed inside a metal stud wall before it is boarded, so that cabinets, basins, radiators, screens and other fixtures have something better than plasterboard to screw into. On site it usually means 18 mm plywood cut in between the studs. It can also mean a proprietary OSB pattress panel, a non-combustible pattress board or a steel pattress bracket, and the right choice depends on the fixture, its load and the wall system specified.
The word has a second meaning: the box behind a socket or switch is also called a pattress, or pattress box. This guide is about the backing board, not the box.
Decide where a wall needs backing before the plasterboard hides the studs. A kitchen wall unit may be drawn in the right place, but its rail still needs a fixing behind it, and the cheapest time to provide one is before the wall is closed.
Which fixtures need pattressing
Plasterboard on its own, with the right cavity fixings, carries light items: pictures, small shelves, a mirror, a toilet-roll holder. Anything heavier, anything that is pulled or leaned on, and anything that would do damage if it fell wants backing fixed to the studs, or a screw straight into a stud.
- Kitchen wall units and tall units. A 600 mm wall unit can weigh 40 kg or more once it is full of crockery, and the rail carries that as a pull-out load.
- Basins, wall-hung WCs and urinals. These usually need the manufacturer's steel frame, not plywood, but the frame itself often needs backing or a fixing into the studs.
- Radiators, towel rails and boilers. Most boiler manufacturers ask for a solid fixing, and 18 mm plywood is the usual answer on a stud wall.
- Televisions and screens on extending arms, where the weight sits well out from the wall.
- Grab rails, drop-down rails and Doc M packs in accessible toilets, which must take a person's weight.
- Hand dryers, baby-change units, soap and towel dispensers in washrooms, and anything in a school or nursery that children will hang from.
- Shelving systems, whiteboards, long blinds and curtain tracks, cubicle partitions and screens.
British Gypsum's design guidance links the fixing to the wall system and the load, and warns that the complete wall has to carry the loads where several fixtures go in. A capacity printed on a fixing packet is not a capacity for every partition.
Plywood, OSB or a non-combustible board
The usual pattress is exterior-grade (WBP) plywood, because it holds a screw well and does not crumble around the thread. Thickness follows the fixture.
| Backing | Typical thickness | Where it is used |
|---|---|---|
| Exterior-grade plywood | 18 mm for cabinets, basin frames, radiators, boilers, grab rails and screens; 12 mm for lighter items such as dispensers and small shelves | The standard choice, cut on site to fit between the studs |
| Pre-rebated OSB/3 pattress panel | 15 mm or 18 mm, 597 mm wide to suit 600 mm stud centres, in 1250 mm and 2397 mm lengths | Drops over the stud flanges, so one person can fix it quickly and consistently |
| Non-combustible pattress board (A1 rated) | Per the manufacturer | Where the fire strategy or the wall specification does not allow timber inside the partition |
| Steel pattress bracket | Made for 18 mm board | Holds a plywood pattress at the stud inside a partition or framed lining system |
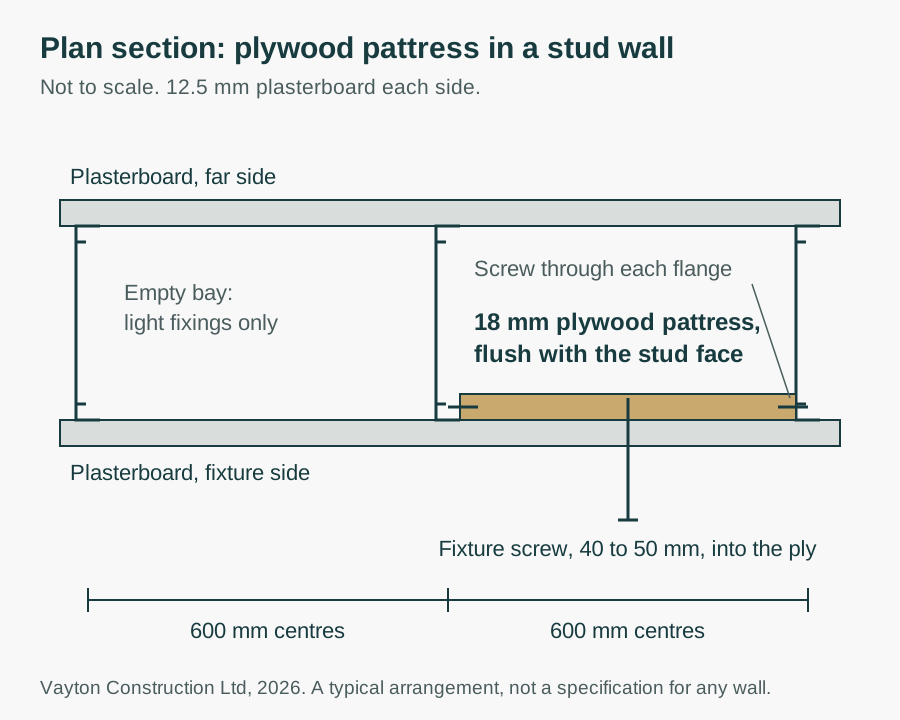
Whichever board is used, it needs to sit flush with the face of the studs, so the plasterboard lies flat over it. A board that stands proud shows through the finished wall; a board set back leaves the screw pulling the plasterboard against nothing.
How the backing is fixed
For a local pattress, the plywood is cut to the gap between the studs, which is about 550 mm at 600 mm centres and about 350 mm at 400 mm centres. It is pushed into the stud cavity, set flush with the stud face and fixed through the stud flange on each side with wafer-head self-drilling screws, or seated in a pattress bracket screwed to the stud. Where the fixture is wider than one bay, the board is fitted in each bay and the fixture screws into every one.
Timber noggins between the studs do the same job for small, well-defined fixings such as a radiator bracket. A full-height sheet of plywood across the studs under the plasterboard is a different detail: it adds to the wall thickness and changes what the wall is, so it only goes in where the designer has specified it.
The fixture screws then need to pass through the plasterboard and well into the plywood without coming out of the back into a cable or a pipe. Through 12.5 mm board into 18 mm plywood, a 40 mm to 50 mm screw is typical, and the dryliner should know what runs in the cavity behind.
Set the heights out from a stated reference, normally the finished floor level, not from the slab. Mark the pattress positions on the floor and on the face of the plasterboard once it is up, so the fitter is screwing into board rather than searching for it.
Fire, acoustics and services
Extra backing does not prove that a wall keeps its specified performance. British Gypsum explains that fire resistance belongs to the complete construction: the framing, the linings and the fixings together. Timber inside a fire-rated or acoustic partition can change that, which is why some specifications call for a non-combustible pattress board or for the system manufacturer's own pattress detail.
Where fire or acoustic performance matters, ask the responsible designer for the wall manufacturer's approved detail or project-specific advice covering the backing and the fixture fixings. Siniat's pattress bracket is one manufacturer's example, supporting local or full-height pattressing in its own partition and framed lining systems; that approval does not carry over to a different wall.
Keep pattresses clear of socket boxes and switch drops, and do not trap pipes or cables behind a board that a fitter will later drive screws into. Include that specification when enquiring about a drylining package. If other trades need access or repairs afterwards, put their requirements in the builders' work and making good scope.
Start with what will hang on the wall
List the cabinets, shelves, screens and other fittings for each wall, including later additions you already know about. For each one, get the product model, its mounting instructions and its intended use. Design the support for the loaded cupboard, not the empty one, and treat anything on an extending bracket as its own case.
Show fixtures on both sides of a partition so backing and services can be coordinated. Some fittings, including basins and grab rails, need a proprietary support frame or another designed arrangement; do not assume plywood is suitable just because it is hidden.
Will the fixings land where the backing is?
The fitter needs the mounting position as well as the outline of the cabinet. Mark the rail, bracket or fixing zone on a wall elevation and give the dryliner and the fixture installer the same drawing.
If the wall units are raised after the backing has gone in, the drawing still looks right but the support no longer sits behind the rail. Any change to floor level, worktop height or layout means checking the backing positions again before the wall is boarded.
A backing schedule can be short
Keep the marked-up elevation and support schedule with the drylining brief. Identify who supplies and installs the backing, who provides the detail and who checks it before boarding. The fixture installer needs the same drawing revision. Keep these details together:
| Information | What to show |
|---|---|
| The wall | Wall reference, specified wall type and current drawing revision. |
| The fixture | Product model, intended use and mounting details. |
| The position | Fixing zone and heights measured from a stated reference. |
| The support | Backing material and thickness, how it is fixed, and who checks it before closure. |
If the fixture choice is not settled, say so. Ask the designer what can be allowed for now and what must wait. Leaving a future fitting undefined does not give the wall unlimited fixing capacity.
Take the record while the studs are visible
Before boarding, check the backing against the agreed drawing and detail: position, material, fixings and clashes with services. Resolve outstanding design questions before the work is hidden.
Take photographs with a tape in shot and keep them with the final fixture schedule. They help a later installer find the backing, but they do not establish its load capacity or replace an inspection.
The IQ Nursery first-fix photographs show plywood backing and metal studs at this stage. They record that project and should not be copied as a backing specification for another wall.
If the wall is already finished
Start with the original wall details and any records of concealed support. Do not guess from the painted surface. A stud finder locates the studs and often the plywood; a small test hole, made good afterwards, settles it where the record is missing.
If opening the wall is necessary, agree reinstatement as well as access. A wall with specified fire or acoustic performance needs a suitable detail for the repair too.
For a Vayton enquiry, send the partition layout, wall types, fixture schedule and mounting details. We fit backing as part of an agreed drylining package, with the installation and responsibilities defined in the quotation. Send your wall and fixture information.
Common questions about pattressing
How thick should a plywood pattress be?
18 mm exterior-grade plywood for anything that carries real weight or pull-out load: wall units, basin frames, radiators, boilers, grab rails and screens. 12 mm is enough for dispensers, small shelves and similar light fixtures. The board must sit flush with the stud face either way.
Does plywood pattressing work for every fixture?
No. Basins, wall-hung WCs and some grab rails need a proprietary frame or another designed support. Get a detail that suits the fixture, its load and the specified wall system.
Can a television go on a metal stud wall without pattressing?
A light screen on a flat bracket can be fixed into the studs themselves if the bracket holes line up with them. A heavier screen, or any screen on an extending arm, needs plywood backing or a fixing designed for the load, because the arm turns the weight into a pull-out force on the top fixings.
When should pattressing be installed?
Before the relevant wall face is boarded. Check the backing against the agreed drawing and detail, then take measured photographs while the studs are still visible so a later installer can find it.
Does extra backing affect a fire-rated or acoustic wall?
It can. Fire and acoustic performance belongs to the complete wall construction, so ask the responsible designer for the manufacturer's approved detail or project-specific advice covering the backing and fixings, and use a non-combustible pattress board where timber is not allowed.